Thursday, June 29, 2017

Sandwich Prep - One Month In

Remember how I posted at the end of May that I was planting tomato plants in the hopes of having tomatoes at some point this summer? The plants were so small and cute and photogenic back then. (You mean you don't remember? Luckily, I have a link to that post right here.)

Well, it's now been a month since those little guys were planted, and I believe we've reached the toddler stage. They're growing pretty well - or at least the surviving three (out of the original four) seem to be doing well.

The set of two, who are slightly surrounded by irises, have reached about 10 or 12 inches tall:


While, at the other end of the same planting bed, our single (not exactly sure what it did with its bedmate - not sure I want to know), is also doing quite well, without the iris interference:


Of course, just as I was feeling pretty good about my plants, I went for a short walk this morning and passed two gardens where the tomato plants are probably three feet tall and already flowering. Which means that they'll have tomatoes a good month or two ahead of me. But - hey - theirs probably won't have been documented in the blogosphere from the time they were just seedlings.

By the way, I don't want you to think that the only thing in our garden is tomatoes. Among the flowers in some pots near our back door you'll also find Super Chilis (really - that's what they're called), which are already blooming and producing the fruit which could, eventually, become part of a spicy, tomato-y dish:

In the meantime, well, I guess I'll just keep going to the grocery store or hunting down a farmers' market or two - because stalking my neighbors' plants would probably be fairly unneighborly.

-----
What's your favorite summertime food? Is there some family recipe that always shows up at the Fourth of July that you're not really sure is actually food? Let me know your thoughts and maybe your food comments and questions will factor into a later post!
 

Sunday, June 25, 2017

Editing 101: The Musicality of Words

I truly love how words sound.

I love the word serendipity, which makes me think of sudden joy.

And the word ephemeral makes me momentarily all happy and warm.

Cozy sounds just . . . well . . . cozy, and spelunking sounds like it will include dripping water in mysterious caves.

There are words, however, that may sound fine but may not mean what you think they mean.

Penultimate is not quite as final as it sounds.

Inflammable actually means the same thing as flammable.

And, getting back to the sound of words, "sang" and "sank" - though both perfectly fine for Spellcheck, as well as sounding almost the same when read aloud - have very different meanings.

Which is why I laughed pretty hard when I read "Exhausted, he sang deep into the chair" earlier this week.


It was, for me, a serendipitous moment of ephemeral joy as I "spelunked" my way through the penultimate chapter of the manuscript.

Friday, June 23, 2017

A Pie Chart of Kitchen Tools (but without the chart)

Summer - along with lemon bars - seems to mean all sorts of pies. After all, this is the time of year when almost everything that can avail itself to becoming pie filling is in season.

From strawberries to tomatoes, and ice cream to whipped cream, it seems that everything goes in a pie crust in the summer.

While I was making some mini peach tarts a few weeks ago (okay... peaches aren't in season yet - I know that - I was actually using a jar of peach preserves), I looked at the tools I was using and realized that they are some of my favorite things in my kitchen.

Do you have something like that? A kitchen gadget, or bowl, or towel, or mug that automatically makes you happy when you use it?

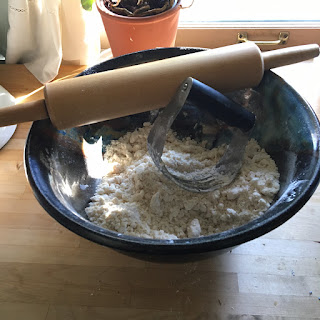
Here are the things that I had pulled out to work on my pie dough:


First of all, I'm not sure you can tell, but that bowl is huge - and I think that a really big, heavy bowl is pretty much mandatory in my kitchen. I use it for doughs of all kinds (from pies to cookies and back again), but also for mixing batters and salads and serving chips. My mom had (and still has) a massive crockery bowl that I used when I was growing up, and mine is about the same size, and it's perfect (if, occasionally, maybe even just a little too small).

The rolling pin actually was my mom's until she got a marble one many years ago. (I swear that she got the marble one before I walked off with the wooden one.) I know that chefs on TV are always happy to have their flat pins with no handles, but I love the handles. They help me stay connected while also keeping my knuckles out of the flour. (Which, really, is kind of ironic considering the next tool.)

That thing in the bowl is a pastry blender. Whenever I watch the TV shows, people are constantly giving recommendations for how to make pastry in the bowl of a food processor, but I've tried that and just don't love it. Sure, it's fine for something like a graham cracker crust, but for a true pie crust (or scones or biscuits or any other flaky dough, in my opinion) you need to have better, more direct, control - and a closer feel for what you're doing.

While I'm at it - and while I'm admitting to putting my hands directly into my dough - I should mention that my most-used kitchen tools are probably my hands.


Have you ever seen the movie Chocolat or the movie Babette's Feast? In each of those, there is a discussion of the way that a cook's emotions impact the final product that leaves the kitchen. I love having my hands in my cooking and baking for that very reason. And I think that being able to look down at my hand and see my wedding ring covered in flour pretty much guarantees that whatever leaves the kitchen is going to be filled with love. 

And, yes, I know that most people will tell you that you should never put your hands into a dough that is supposed to be flaky because it will mess up your butter. But... well... they've obviously never tried my pie crust. 

--------
So what are you cooking this summer? Is there anything you are considering making that you'd like me try, first, so you know what you're getting yourself into? Let me know and I'll be happy to get my hands dirty on your behalf.

Sunday, June 11, 2017

When Proofreading Gets Graphic(s)

I know I've mentioned many times that Spellcheck should be considered a "frenemy" because it doesn't always catch obvious errors.

Unfortunately, once you get really used to having Spellcheck in all of your documents, you tend to forget that it doesn't check the spelling of graphics. In other words, if you've got an artist creating images for you, those images won't be checked by the program when they're inserted into your work. (Which probably seems pretty obvious.)

What may not seem quite so obvious is that this also applies to a lot of file-creation programs. Even programs that are made to integrate seamlessly into MSWord or other word processing programs don't usually have MSWord-style spelling checkers. In other words, if you import a spreadsheet from Excel, or an image from PowerPoint (to name just two programs) - there is an odds-on chance that your MSWord won't spellcheck them for you.

(I should note that there are ways to have your spreadsheets be readable to MSWord, but they can result in the formatting being really off. So most people - for the sake of formatting ease - tend to import them as images. Hence the problems.)

Much of the time, this isn't a problem. After all, a good graphic tends to rely on the images, not the text. But... well... sometimes even the shortest phrases can have errors that slip past people.

I won't mention which morning show this came from - but if you figure it out that's on you.
And... yep... suddenly that typo is being broadcast to a nationwide audience. (Unless, you know, a "seson" is a Florida thing I don't know about.)

Proofreaders - we're the people who keep your graphic text from resulting in graphic language.

Friday, June 9, 2017

If It's Summer, It Must Be Lemon Bars

I know that I usually start my recipe posts with a photo of the recipe and ingredients, but I wanted to start with a photo of the end product, just so you know what goodness you're in for:

Honestly. Flaky crust, sweet/tart filling. All done in about an hour. SO good.
The version I make comes from The Joy of Cooking.
As you can probably tell, this has been around for a few years and is well-loved.
I have some friends and relatives who may call foul when they see the next photos. You see, I've been known to give these to people for their birthdays - and I think most people think I'm putting in lots of time and effort. But these are so easy - and all done in one bowl, so there's not even much clean up.


Yes, the page is dog-eared. It's also coated in splatterings of lemon and melted butter.
The two stacks are the two layers: crust on the left, filling on the right.
Lately, I've taken to using more sprays for greasing my pans, but for this one, you've already got the "butter paper" so it just seems easier to grease it the old-fashioned way.
Part of me feels like I should flip this photo (because it does kind of seem like the pan is floating, right?), but considering what came next, I figure this is fine.
This recipe is for an 8"x8" square pan. If you're not sure how big your pan is, it's best to err on the side of "too small" instead of "too large" because... well... you'll see.

The crust comes together so quickly, it's kind of ridiculous. Flour. Powdered sugar. Melted butter or margarine. Done.
OOhh... action shot!

Once you've got your ball of dough, you just mash it into the bottom of the greased pan. If possible, you push a little extra up the sides of the pan to form a kind of lip, so that the filling doesn't automatically overflow.

Unless you're in the Witness Protection Agency, I highly recommend using your fingers for this (though you will be prone to leave fingerprints everywhere after you're done, because... well... grease).
At this point, you pop the crust into the oven for 20 minutes at 350 degrees. This gives you time to do things like take the dog for a quick walk and/or start the sprinkler on the front yard (for example).

With about 5 minutes left on the bake, I typically start the filling. (I could do it later, but I like the chemistry too much - you'll see what I mean in a moment.)
Please note: That lovely lemony color comes from the eggs, not from the lemon. (You can see the lemon peel still on top of the whisk.)
When you've whisked it all together, you get a glorious (though maybe slightly grainy) liquid lemon curd.
Yep. That's the same bowl I made the crust in. Why would I dirty a second one?
At this point, you pull the oven rack out just enough to pour the filling into the crust.

Unless... well... you open the oven and see this:
It was so bad, I even forgot to change the photo from rectangular to square.
This is where the whole "know your pan size" comes in. Apparently that's a 9"x9" pan. Which (quick math, anyone?) has a bottom surface that is about 17 square inches (not quite 25%) larger than that of an 8"x8" pan.

You know what happens when you spread the same amount of crust on that much larger a pan? It gets really thin. And it pulls and shrinks when it bakes, leaving you with massive fissures.*

This is bad, since it means that the filling will just flow straight through to the bottom of the pan. So... Well... If you look closely at the top of that photo, you'll see more margarine being melted.

Take two:
Ironically, I usually use these disposable pans, because usually these bars go to other people. I honestly never even thought about the size...

I should mention that a few small cracks are fine. As is the crust pulling from the sides of the pan. (This, of course, is assuming you've greased the pan well.)

Now that the crust is ready, it's time to give the filling another good stir and then pour it over the crust. But, first, take a moment to check out what happens when you mix lemon juice and baking powder:
Our creamy curd done got foamy, all on it's own!
I really wish I had a photo of me tipping that bowl of goodness over the warm crust (which was still on the rack in the oven), but I don't have enough hands for that kind of photography.
Here's what it looks like once the pouring is completed and I have an extra hand for the camera, again.
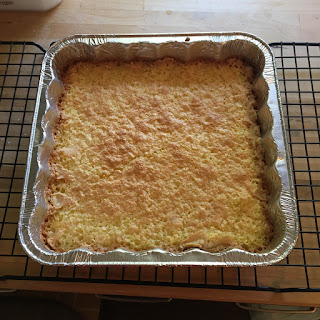
About 25 minutes later (after doing all of the dishes and moving the sprinkler), the bars will have puffed up just a bit and gotten a bit golden on top.


No, this isn't what they usually look like when you serve them. But some cooling has to take place, first. (If your kitchen isn't too warm, another half hour or so - basically one more rotation of the sprinkler - is usually enough.)


Again, we come to a point where I needed a third hand to get an action shot, so here is the basic idea of how you can get an even sprinkling of powdered sugar over the top of the bars:
When I was growing up, my mom would actually make these with a very thin layer of powdered-sugar glaze on top instead of the powdered sugar. Either way, that little bit of sweet is really nice.


Of course, I couldn't end this post without showing you a cut piece, so I had to cut into them (even though I'm supposed to be taking the pan to a dinner tonight). All in the name of journalism, folks.


The recipe says you can cut this into 16 pieces. Even in the enlarged photo, a 2"x2" bar still seems kind of small.
Seriously. How could you not agree that one (pan) of those would be perfect with some chilled white wine or maybe beside a Coke (mmm... lemon Coke) on a hot day?

*Don't worry. That fissured pan of crust didn't go to waste. Why would you throw away a lightly sweet, buttery (okay, margarine-y) crust, when you could eat it right out of the pan? So good.

-----
Have a recipe that you've always wanted to try but aren't brave enough? A family recipe that you're not sure still works? Or maybe a recipe you've heard of but never found? Let me know and I'll see if I can whip it up and feature it in a future post!