Let me explain:
Before we go on: How great to do those tomatoes look?
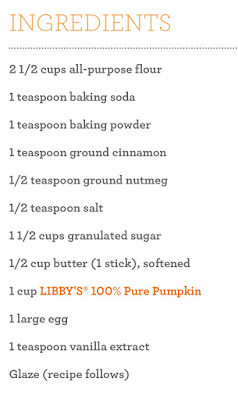
Here are some images of the recipe (which can also be found here):
 |
| Note: If you didn't watch the video, I feel I should point out that I used Bob's Red Mill Gluten-Free 1-to-1 Baking Flour in these. |
 |
| Can you see the gluten-free flour in there? |
 |
| Honestly - these are not hard to make! |
Dry ingredients went together, first:
 |
| Can you believe it? I think this is actually kind of an interesting dry ingredients photo! |
 |
| Yep. Boring, again. |
 |
| Okay. I won't lie - this step would have been easier with the mixer. |
 |
| I'm not really sure what that looks like. Maybe a dual-star nebula of some kind? |
I wasn't quite sure if I was okay with that, so I switched over to a whisk, which did get it a little smoother, but not much:
Finally, the dry and the wet ingredients got to play together in the same bowl.
 |
| It feels a little weird adding it in in stages (that's usually something you do for cakes), but when you realize that you normally add flour "a cup at a time" this makes more sense. |
 |
| Not gonna lie - it smelled a lot better than it looked at this stage. |
Finally, all of the flour mixture is in, and the batter/dough smooths out.
 |
| And, c'mon - is that color not exactly what you think of when you think of pumpkin? |
You may notice that one photo is missing from this set: the "in the oven" photo. I was good this week and didn't open the door to take any pictures! Aren't you proud of me?
These do need to rest - twice. Once on the pan for a couple of minutes to finish setting up before being moved to a rack, and again on the rack until they're cool so that you can glaze them and the glaze won't just melt and run off.
Speaking of the glaze... The ingredient list for it is in the final step of the actual recipe. (Not a great way to do it, but... oh, well.)
 |
| Yes, I decided to add in some cinnamon (which isn't in the recipe). I just thought it would go better with the cookies than a plain sugar glaze. |
 |
| Due to the camera angle, that butter pan looks huge! In reality, it's only about 3 inches across - while the bowl is about 12 inches. |
 |
| Quick poll: Would a spoon or a straw be your preference when faced with a bowl like this? |
I don't have any great secret for how I glaze cookies like this. I just kind of drizzle the glaze off the spatula as I go back and forth. Sometimes that works better than others. (Check out the wrap-up video - and the eventual outtakes - for examples...)
 |
| I did double the recipe, but - still - I got a lot more cookies than I expected. |
Oh, and if you want to see what happens when I get ahead of myself (or forget what I'm talking about, or get distracted by something shiny), I may have a treat for you in the coming weeks.
-----
Looking for something to fill the fall food void? Wondering what to bring as a side dish to the office Thanksgiving potluck? Trying to find the perfect food for a New Year's party? Let me know and I'll see what I can do!


1 comment:
These are so yummy! And I, also, use the "bash the whisk on the bowl" method for getting stuff out of the middle.
Post a Comment