Spoiler alert - in case the name of the post didn't clue you in already - this is what we're aiming for in this post:
Allow me to explain why a coffee cake (which is typically made in a 9x13 pan) looks much more individual-size in that photo:
(So, Mom, any idea where the recipe came from?)
Do you ever watch those cooking shows where the chefs really want the average people to do good mise en place and also keep really clean and tidy cooking stations?
Well, at least I've gotten better at amassing my ingredients and doing the really basic portions of the mise en place...
 |
| No, it's not your imagination. The egg on the right does have a dent in it reminiscent of the side of the Death Star. (Once I noticed that I tossed it and got out a non-pre-cracked one.) |
Step two: Adding the milk and eggs.
Step three: Adding in the flour (half at at time), salt, and baking powder.
Yes, I know that the recipe simply said to mix up all of those ingredients, but it just felt better to do it in stages.
Though... it didn't really look all that great:
Somewhere around this point, Christopher walked through the kitchen and I admitted that possibly using the mixer would have been faster. (And you all know how seldom I say things like that.)
 |
| It did turn out pretty well, though. |
 |
| If I didn't have this pan, I might have tried lined cupcake pans. |
The batter will spread when it heats up, but in order to get a relatively even "streuseling" I wanted to get it pretty close to the corners from the outset.
Oh. Wait. The streusel! How could I forget!?
 |
| Don't worry. I didn't actually forget. |
A quick mix, and this all comes together pretty fast.
 |
| I know that it looks like brownie batter, but it smelled like cinnamon heaven. |
(I mention in the wrap-up video that I changed things out just a little in this step. In a larger pan, you would spread out half of the batter, then do a scattered layer of the streusel, then the rest of the batter, and finally the rest of the streusel. For these shallow pans, I just did one layer of each.)
Here's what they looked like at the halfway point.
 |
| This is why I always end up opening the oven door to take photos. |
 |
| *So* much easier to see when you're not photographing through the window. |
I took the first batch out of the oven after about 14 minutes. The recipe - if working with a full-size pan - calls for about 25 minutes. But I did the finger test (bouncing your finger on the top of them to see if they spring back) and these were definitely done.
 |
| One caveat: The brown sugar/cinnamon/butter on top of these is pretty much molten lava when it's in the oven. Be very careful when you choose which areas to test with your fingertip. |
 |
| It's probably just me, but does that look like some kind of old-school video game layout? |
You can see me remove some of the waxed paper in the wrap-up video (it came off really easily... mostly), but here is the aftermath:
 |
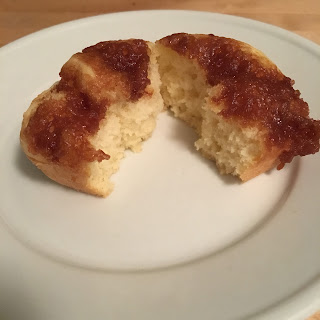
| Why do I say only "mostly"? Because in some cases the sugar had already hardened and attached itself to the waxed paper. There are a couple of "torn" cakes as a result... |
And just look how tasty that looks when you open it up! It's spongey and cinnamony, springy and full of warm flavor.
The second batch - because the raisins held the streusel in place a little better (I think - at least that's my theory), had a more centralized streusel look when it came out of the oven.
On the plus side, people should have no trouble guessing which is which!
If you scroll up to the earlier one, you can see that the raisin streusel really stayed in place, and kind of "sank in" as opposed to the way the regular streusel sat on top of the batter and rode it out that way.
So, how were they (aside from being individually sized)?
Oh, and, yes, by the time you're reading this, they will have been served at my work meeting. If anything goes horribly wrong - or incredibly right - I'll update this and let you know.
UPDATE: These little hand-sized coffee cakes were a HIT! They flew out of the tray during our meeting, and by the time I was back to my desk there was only one left. Since most of these ingredients are probably in your pantry - maybe this would be a good weekend to see how happy you can make the people in your life.
-----
Have a recipe you want me to try to miniaturize? Or something you've always wanted to try but were slightly afraid to? Maybe something you're considering taking to work? Let me know! I'll gladly try to put it together and share it in a future blog post!


1 comment:
you seem to really like the brownie pan...wouldn't have thought to use it.
Post a Comment